
Lessons:
P-9 Maria Sibylla Merian
Northern Lapwing
Overview
- Discuss Northern Lapwing by Maria Sibylla Merian.
- Learn about creating movement with bent lines.
- Create a bird in motion.
Reflection
- Who lives in the house that you created?
- What colors and objects did you add to describe mood of the house?
- What is the title of your artwork?
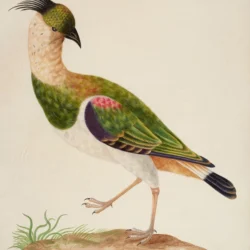
Northern Lapwing (c. 1705?) by Maria Sibylla Merian, watercolour and gum arabic on vellum, 15.35 x 11.69 in. (39.0 x 29.7cm), image credit: Royal Collection Trust / © His Majesty King Charles III 2023
Discussion Presentation
Discussion Questions
Would you recognize this bird if you saw it outside?
Merian was a scientific illustrator. She painted creatures in nature for identification purposes. Her paintings are very realistic in size, color, and detail.
What in this painting would feel soft? sharp?
Merian illustrates textures of the bird by using tiny brushstrokes to show the difference between a stiff feather and fuzzy belly. She made the claws and mohawk look sharp by using detailed black lines.
How did Merian show the bird is moving?
Angled lines show movement. Instead of a stiff statue, she drew the bird mid-stride to capture how they actually move in nature. The neck of the bird is turned while the leg is raised high up at an angle.
Biography
- Maria Sibylla Merian (Mah-REE-ah Sih-BILL-ah MEH-ree-ahn) was a German artist.
- She was a scientific illustrator who drew bugs and birds with such detail that they looked real.
- She started a journal of plants and insects that she captured at age 13.
- She is a German artist who illustrated bugs and birds in such detail that they looked real.


Project
Materials
- sketch paper
- 9×12 white paper
- drawing pencil
- soft chalk pastel
- paper towel
- fixative or aerosol hair spray
- How to Draw Birds in Motion handout
Warm Up & Brainstorm
- 3-minute sketch: use How to Draw Birds in Motion handout.
Project Directions
Bird in Motion
1. Create the contour of a bird in motion using simple geometric shapes.
Use ovals, triangles, and rectangles with a color chalk pastel on the 9×12 white paper.
Do not use pencil on the project paper. Chalk pastel does not adhere to pencil graphite. Use color or gray chalk pastel instead of a pencil.
Do not use black chalk pastel, unless the bird is black.
2. Fill in the contours with chalk pastel.
Use the broad side of the chalk for quick shading. Using a paper towel of finger to blend the chalk.
3. Add detail.
Feathers, markings, legs, feet, beak, eyes, etc. Use the edge or tip of the chalk pastel.
4. Draw a horizon line.
Note that the horizon line is not necessarily at the birds feet.
5. Fill in the background with a watercolor wash.
Pre-Lesson Preparation
- No prep required.
Day of Lesson Setup
- Demo chalk pastel lines: thin, wide, and broad-side.
- Demo drawing the contour and shading in a bird. Emphasize using the broad side of the chalk pastel.
- Demo an angled leg or wing Watercolor and gum arabic on vellum, 15.35 x 11.69 in. (39.0 x 29.7cm) to show motion.
- Demo add details using the tip or edge of the chalk pastel.
- Demo blending two colors with chalk pastels.
- Do not blow chalk dust. Turn project paper over and tap once to remove excess dust.
- Tip: adults, spray the fixative. Hold aerosol 6-8 in. from paper and spray evenly across entire paper. Spray outside if possible.